It is well settled that mold in the home will cause health problems. Carpeting in itself may be suitable for mold growth and may be a depository for many of the nutrients that are the base for mold growth. With water present or a continuous presence of high humidity mold growth is to be expected and is almost unavoidable to some extent. With regular carpet cleaning and moisture control a mold can not and will not grow and eliminate the concern. When damage is discovered it must be documented for compensation purposes. At times a legal consultation should be considered when there is a question of liability or claim for damages from insurance or others.
If there is a large fungal mold presence or you have health related symptoms you must have a proper and fully qualified lawful environmental study performed before these biologicals are disturbed for fear of spreading, exposure and making it undeterminable as to the nature of the presence in the event a study needs to be performed for legal or health purposes. Contact us immediately if you have such a case for a free consultation..
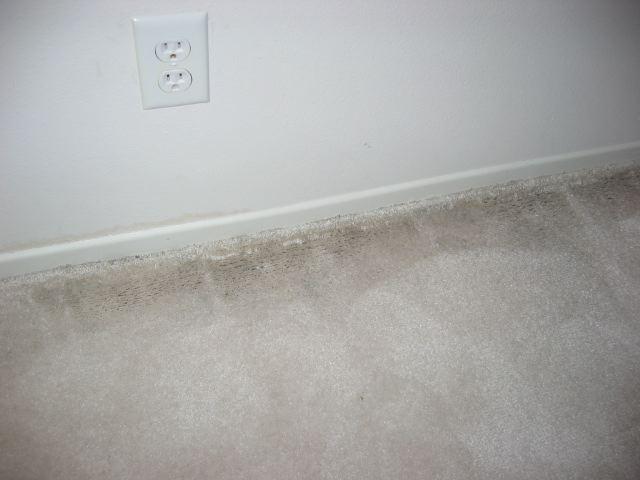
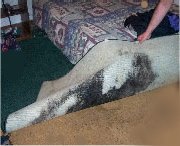
| When present in large quantities, mold can cause health problems, including allergic reactions, toxic reactions, asthma episodes, infections and respiratory damage. In addition, homeowners can incur large bills for structural damage caused by water in or under carpeting. This is a prime location for mold to grow. That's why it's important to identify potential areas or situations where mold can grow. For mold to grow it needs nutrients and moisture. Fortunately both can be monitored and controlled.
Prevent Mold Growth
- Clean, disinfect, and dry surfaces.
- Check for leaks; if leak is found, repair and clean any moisture damage caused by the leak.
- Reduce moisture in the home by using source point ventilation for moisture producing areas, and low speed continuous ventilation for good overall moisture control.
- Keep relative humidity in homes to between 40 - 50% year round by monitoring with the use of a hygrometer. Get a digital one from Radio Shack $10-15.00 or free one from N.J. Mold Inspection.
- Increase air flow in home by moving furniture away from walls and opening closet doors.
|
Fungal Abatement Safe Operating Procedure
(In no cases must anyone that has respiratory, allergic or any related health condition perform such work without the advisement and consultation with their physician)
This standard operating procedure is used by the University of Minnesota Facilities Management Asbestos Abatement personnel during projects and job tasks that require the removal of mold bearing building materials. These are common best practices for limited mold conditions. Areas larger than 10 square feet must employ a fully qualified and professional toxic mold remediation company.
Primary Steps:
1. Communication of risk
2. Personnel professional trained and experienced
3. PPE - proper Personnel Protection Equipment must be used
4. Hygiene practices to assure safe removal
5. Containment of Affected Area
6. Control of Exposure to Adjacent Areas
7. Careful selection, use and application of remediation chemistries
8. Removal of Containment Materials
9. Cleaning of Mold Containment Area
10. Containment of Area Use During Reconstruction
11. Post Remediation Validaton for safe return of occupants
Procedural notes and requirements:
Step #1: Communication
* Consult with a professional medical mycologist and certified industrial engineer before any remediation activities to define the areas of removal and provide oversight for the project.
* Consult with property owners, occupants and local health officials as law requires for compliance and reporting.
* Develop a project time line and communicate this with all parties involved prior to the remediation and construction project. Provide contact numbers to all involved in the remediation project. *
Step# 2: Personnel
* Individuals trained in the handling of hazardous materials.
* Provide right-to-know training on exposure to the chemicals used and the health effects of exposure to the fungal organisms.
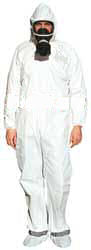
Step #3: PPE
* Full faced negative pressure respirators (North 7600 series) with CD/CL/HC/HF/OV/SD/P100 cartridges. The cartridge protects against chlorine dioxide, chlorine, hydrogen chloride, hydrogen fluoride, organic vapor, sulfur dioxide and provides a HEPA filter to protect against particulates.
* Disposable tyvek coveralls covering both the head and the shoes.
* Gloves: Neoprene, Rubber, leather or cotton depending on the material to be removed. Leather is recommended when sharp material is expected to be encountered during the demolition.
* Tools: Pliers or cutters to break up metal mesh in plaster walls. These and other tools are used to reduce skin contact with sharp objects.
Step #4: Hygiene
* Wash hands after exiting the enclosure and prior to using the hands to place anything in the mouth. Fungal organisms can cause dermatitis. Ingestion of the bacteria or fungi can cause severe diarrhea.
* During the exit from the enclosure, remove the coveralls leaving them inside either the enclosure or the first stage (dirty room) of the two-stage decontamination room. In some cases, space will not allow for construction of the decontamination room.
* In the change area, doff the respirator. Remove the cartridges. Clean the surfaces of the cartridges with a disinfectant wipe and keep the cartridges for reuse. Soak and clean the respirator in a gallon of disinfectant (1/2 oz. A-33 quaternary ammonium disinfectant per gallon of water). Rinse the respirator in water, clean with a disinfectant wipe and dry with a clean towel.
* After an exhaust fan with a HEPA filter is used on a job site the prefilter is covered with 4 - 6 mil poly and sealed with duct tape.
Step #5: Containment of Affected Area
* Completed isolation of work area from occupied spaces using plastic (4-6 mil poly) sheeting sealed with duct tape (including ventilation ducts/grills, fixtures and other openings).
* Use an exhaust fan with a HEPA filter to generate negative pressurization. Use the appropriate sized unit for the space. For example, an Ulti Vac may be used for a glove bag removal, a HEPA Jr. for an office-sized room and larger units for bigger areas. Do not use the same units for Asbestos and mold removal. If units are shared a break in the HEPA filter could change a mold containment into an Asbestos containment.
* The two sections of the Ulti Vacs are reinforced with duct tape wrapped around the taped junction in the middle of the vacuum unit.
* If space allows, construct a two stage decontamination room with a changing area and a dirty room attached to the entrance of the containment area.
Step #6: Control of Exposure to Adjacent Areas
* Vacating people from spaces is not necessary but is recommended for individuals with reduced immune systems, infants, recent surgery patients, people with chronic inflammatory lung diseases or individuals with respiratory health concerns (asthma, hypersensitivity pneumonitis and severe allergies).
* In general, there are fewer occupant complaints about the remediation if the adjacent spaces are vacated. The complaints about construction related odors are reduced and there is more space to place cleanup material.
Step #7: Remediation Best Practices
* Exhaust fan discharge is outside building - Keep HEPA exhaust fan on during the application of bleach and Foster's 40/20 anti-microbial paint. Make sure adjacent outside windows are shut, the discharge is not close to an air intake, and window air conditions are shut off or set on re-circulation.
* Exhaust fan discharge is inside building - Shut off HEPA exhaust fan during the application of bleach and Foster's 40/20 anti-microbial paint. Turn the fan back on when the odor is no longer noticeable.
* Applying bleach to visible fungal growth prior to removal of material. Apply the bleach solution to the surface and wait two to five minutes prior to removing the material. This provides sufficient time for the bleach to disinfect the material and reduces the dust generated because the material is wetted.
* In some cases, a surface is lightly misted with a bleach solution prior to painting with Foster's 40/20. Painting of the surface may begin within five minutes of the bleach misting.
Step #8: Removal of Containment Materials
* Containment materials that cannot be cleaned should be removed from the building in sealed plastic bags. The outside of the bags should be cleaned with a damp cloth and a detergent solution or HEPA vacuumed in the decontamination chamber prior to their transport to uncontaminated areas of the building. There are no special requirements for the disposal of moldy materials. Moldy materials that are bagged can be disposed of with other general waste.
* Dirt, debris, and broken plaster may be placed in 55 gallon drums inside the containment area. Before removal from the containment area, close the drum and clean the outside surface.
Step #9: Cleaning of the Containment Area
* The contained area and decontamination room should be HEPA vacuumed and cleaned with a damp cloth and/or mop with detergent solution and be visibly clean prior to the removal of isolation barriers.
Step #10: Containment of Area Used During Reconstruction
* After the containment area has been cleaned the enclosure can be used to contain the dusts generated by the sheetrock sanding and taping activities. This is done to reduce the problems with clean up when reconstruction is completed. The use of the HEPA exhaust filter is not required. The two stage decontamination area is also not needed.
Step #11: Post Remediation Validation and Final Inspection
* Prior to re-occupancy of the space an inspection and or air sampling and subClinical Investigation® will be done be by a certified clinical industrial hygienist. Re-occupancy may occur when the remedied areas pass the inspection.
|